Using IMAP/SMTP on iOS: Unterschied zwischen den Versionen
Aus JHML Knowledge Base
Die Seite wurde neu angelegt: „To connect your account to your iPhone by using the Stock mail app, you need to follow these steps: # Open the iOS "Settings" app and scroll down to the "Mail" app. # Open the Mail settings and select "Mail Accounts" # On the next screen select "Add Account" # Now tap on "Add Mailaccount" # Select "Microsoft Exchange" # Now enter your email address and a unique name for your account # Now tap on "configure manually" # The mail app should catch all necess…“ |
Keine Bearbeitungszusammenfassung |
||
| Zeile 5: | Zeile 5: | ||
# On the next screen select "Add Account" | # On the next screen select "Add Account" | ||
# Now tap on "Add Mailaccount" | # Now tap on "Add Mailaccount" | ||
# Select " | # Select "other" | ||
# Now enter your email address and | # Now enter your details like name, email address and password | ||
# | # Configure the mailservers of your account (mx.jhml.de) | ||
# Select which details you want to synchronize. | # Select which details you want to synchronize. | ||
# The account is configured and ready to use :) | # The account is configured and ready to use :) | ||
Aktuelle Version vom 30. Oktober 2024, 21:34 Uhr
To connect your account to your iPhone by using the Stock mail app, you need to follow these steps:
- Open the iOS "Settings" app and scroll down to the "Mail" app.
- Open the Mail settings and select "Mail Accounts"
- On the next screen select "Add Account"
- Now tap on "Add Mailaccount"
- Select "other"
- Now enter your details like name, email address and password
- Configure the mailservers of your account (mx.jhml.de)
- Select which details you want to synchronize.
- The account is configured and ready to use :)
Here are the screenshots from iOS:
-
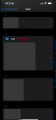 Select the "Mail" app in Settings
 -
 Select "Mail Accounts"
 -
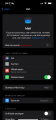
 Select "Add Account"
 -
 Tap on "Add Mail-Account"
 -
Select "Other"
-
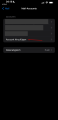
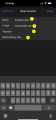 Enter your name (1), your email address (2), your password (3) and a short note about this account (4)
 -
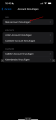
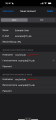 Add the serverurl (mx.jhml.de) to incoming and outgoing Hostname
 -
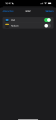 Select which parts of your account you want to sync with your phone


